Recommended Age: 4 and ½ years and onwards
Purpose: for the child to build fine motor control and coordination through using a sewing needle. This exercise also teaches the child a practical real-life skill which they can apply in real scenarios for example if a button comes off an item of their clothing
Level of Parent Involvement: Medium, the adult must model this exercise for the first time, with practice the child will work towards mastery requiring low supervision
Prerequisites
- The child has a good level of fine motor control and is able to manipulate an instrument with precision
- The child has worked with sewing cards prior to completing this exercise and understands the concept of over and under when sewing or completing a threading card
Materials
- Small squares of material (scrap fabric) in different colours and patterns
- A selection of large buttons, with two holes
- A small box or container to keep the buttons
- A sewing needle with a wide eye
- Thread
- A pin cushion
- Scissors
- A small tray or basket to keep the materials
Preparation
- Cut the fabric into small squares (15cm by 15 cm is ideal)
- Place the materials into the tray/basket
Steps
- Invite the child letting them know that you will be showing them how to sew a button onto some fabric
- Show the child the fabric squares, the child may choose which colour they would like to use
- Show the child the tray/basket with the materials and bring to the child table
- Name each of the materials in the tray/basket (thread, pin cushion, needle, buttons)
- Invite the child to choose a button
- Show the child how to thread the needle by taking the end of the thread and pushing it through the eye of the needle, tying a knot to keep it secure
- Tie another knot at the end of the thread
- Take the fabric and choose where to sew the needle on by placing it into position
- Hold the button against the fabric, lifting it up
- Take the needle and line it up with one of the button holes at the back of the fabric
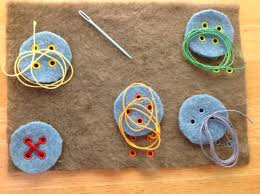
- Push the needle through until it stops at the knot, turning the fabric so that you are now looking at the button on the front of the fabric
- Now push the needle through the other button hole, pulling until the thread stops at the knot and is through to the back
- Repeat a couple of times until the button is secured to the fabric, stopping once the needle is at the back of the fabric
- Show the child how to cut the thread allowing enough thread to tie a knot to further secure the button onto the fabric
- Invite to sew their button onto the same piece of fabric or get their own piece of fabric
- Invite the child to have a turn to thread their needle, assisting if necessary
- Leave the child to work independently
Variations
- Sewing a button with 4 holes